2. Seqinspector-one
2.1. What is seqinspector-one?
The seqinspector-one was designed to provide a computational service that utilizes up-to-date ChIP-seq data. Seqinspector-one allows to study the functional enrichment of single user-defined gene or DNA region.
2.2. Contents
2.3. User interface
User interface consist of four parts. On the top of the page there is a navigation bar with some internal links to help or other tools. On the left there is an input part in which you can select genome assembly, input your gene name or genomic range and submit it. Right from it there is a list of transcription start sites if a gene name was submitted. On the bottom of the page is table with results sorted by p-value.
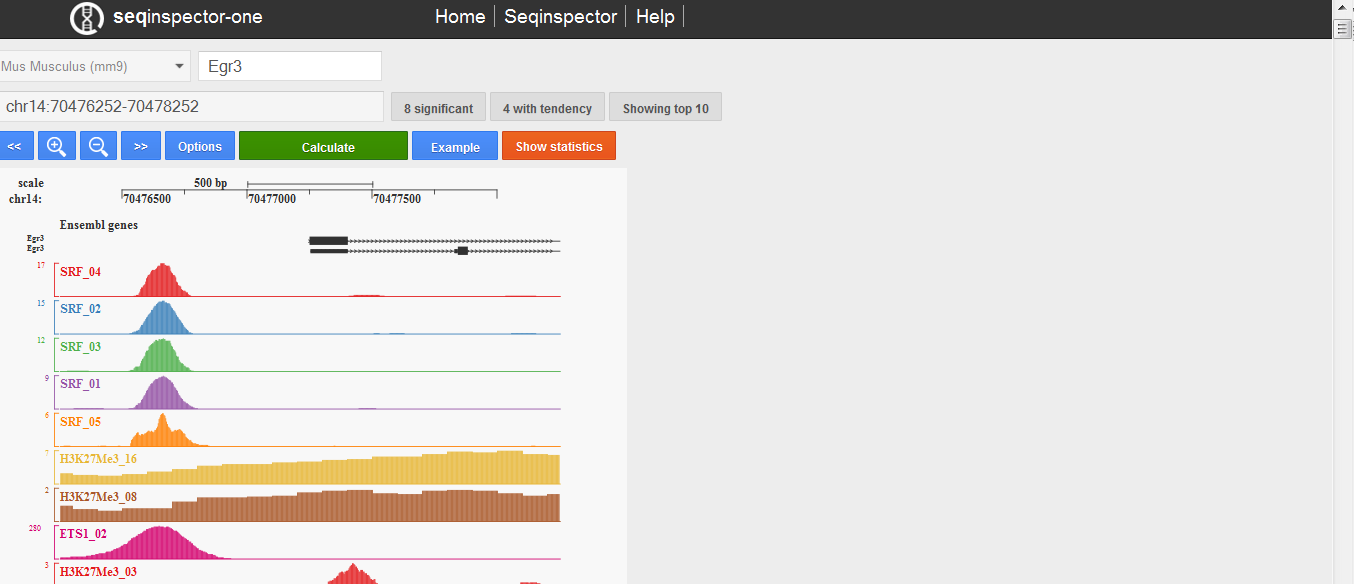
Seqinspector-one user interface. The first row consists of: genome assembly selector, gene symbol (or genomic range) input, number of transcription start sites infobox, transcription start site selector. The second row consists of text are with analysed genomic range, number of significant overrepresentation tracks and number of tracks with tendency. The third row consists of manipulation buttons: move left, zoom out, zoom in, move right, options, submit (calculate), move to bottom (to statistics table). Plot in the middle shows selected (by default top 10 sorted by p-value) ChIP-seq tracks for selected promoter or genomic range. On the bottom there is statistics table.
2.4. How to use it?
2.4.1. Step 1: Prepare your list
You should prepare your input in one of the following formats.
2.4.1.1. bed
chr16 30254029 30255503
2.4.1.2. genomic coordinates
chr10:66999617-67001617
2.4.1.3. gene symbols
Egr1
2.4.1.4. ensembl transcript ids
ENSMUST00000165033
2.4.1.5. refseq mRNA ids (no subversions)
NM_007913
2.4.2. Step 2: Choose genome assembly
You are allowed to choose between Homo sapiens (hg19) and Mus musculus (mm9, mm10)
2.4.3. Step 3: Insert your query
If you will choose to insert gene symbol there is autocomplete mechanism that starts to work after first two letters. If there are more than one transcription start sites for submitted gene user can choose between them in the selector box.
2.4.4. Step 4: Submit and wait
There is autosubmission mechanism in seqinspector-one. However, in case that something will not work you can press “compute” green button. Seqinspector will automatically convert gene symbols or transcripts into genomic intervals 2000 bp long around transcription start sites. Seqinspector will then compute coverage from all available tracks for your query and will compare to genome average.
2.4.5. Step 5: Inspect image
Image shows selected tracks and ensembl gene annotation in the selected query range. Selected tracks are presented as coverage histograms (with minimum value of 2 on the Y axis). You can choose tracks for visualisation in the results table (see below).
2.4.6. Step 6: Inspect results
After pressing the “Show statistics” button table with results will be presented on the bottom of the screen. The tracks are sorted by p-value of significance. The columns are:
- Track name - it is internal id of a track, that contains short name of a transcription factor
- Query - coverage for query range
- Background - avergae coverage of precomputed reference set
- Fold diff - fold difference between query and reference
- P value - significance of difference between query and reference datasets (calculated by z-score)
- Bonferroni - Bonferroni corrected p-value
- Stack plot - heat stacked plots presenting distribution of coverages in all query sets with respective p-values
- Description - description of a track
2.4.7. Step 7: Change options
Change database. In seqinspector there are two databases: (1) Mus musculus and (2) Homo sapiens. You can inspect Human tracks with your murine genomic coordinates. Mouse coordinates will be translated into Human coordinates using liftover tool.